My goal is to make Docker basics easy to understand for beginners. If you’re new to Docker or not sure where to begin, start by using Docker to containerize your application in a development environment. Keep reading to learn more.
What is Docker?
“Docker is a tool that simplifies the process of creating, deploying, and running applications using isolated environments called containers”.
If you haven’t used Docker before, this may not make much sense now. If you’ve used Vagrant with any of the virtualization tools such as VirtualBox or VMWare, you can relate to this to an extent.
Let’s avoid comparing Docker to virtual machines and instead look at an example to understand the usefulness of Docker.
Say I’m building an API app using Node 19, Yarn for packaging, and I want it to run on a secure Linux OS (Alpine Linux). The thing is, I’m on a Mac with an older version of Node & Yarn installed, and I don’t want the new setup conflict with the currenly installed node or yarn. Plus, I need to make sure that the app runs on the same versions of OS, system libs, and Node no matter where it’s deployed - from my local machine to production. Also, in the staging & production environments, I should be able to run the application on shared servers without having to install any tools (OS, libs and runtime) specific this new application.
With Docker one can achieve this easily. To get started with Docker for our app, we first write a Dockerfile.
Dockerfile
Dockerfile contains a bunch of instructions, commands, and settings to package the app and create Docker Image. The image built will include everything you need to run your app, like the OS/libraries, runtime, application build files, and dependencies such as node packages, ruby gems, etc. Check out the example below for a Node Application.
# Base image from DockerHub (node image with alpine linux)
FROM node:19-alpine

# Directory inside the container to be used as workdirectory '/app'
WORKDIR /app

# Copy the package.json and yarn.lock files to the image
COPY package*.json yarn.lock ./

# Install any dependencies
RUN yarn install

# Copy the app code to image, under current work directory (. is /app)
COPY . .

# Start-up command: "yarn start".
CMD ["yarn", "start"]
This Dockerfile will be copied to the root directory of the application’s source code. And this file will be used to build a Docker Image for the application. Let’s take a brief look at the contents of the Dockerfile.
- The first line
FROM node:19-alpinesets the foundation in whichnode:19-alpineis a Docker Image from the DockerHub and it comes with all the OS, libs, runtime/nodejs and yarn installed. While there are many variants of Node image on DockerHub, we picked the one built on Alpine Linux OS. - Whether the app is run on local machine, physical server in prod or an isolated environment as container, we need a work directory. The line
WORKDIR /appindicates that/appwill be the work directory when the app is run as container using image built using this Dockerfile. - The line
COPY package*.json ./is to copy the package.json and lock file to the image so that we can run the commandyarn installto install all the package dependencies. The next lineRUN yarn installdoes that. These two instructions,COPY&RUN, are the build time instructions. - The line
COPY . .is another build time instruction that copies all the files & directories from the current directory (application’s source code) to the current directory (same as the work directory) inside the image/container. Optionally, there may be commandRUN yarn build. - The last line,
CMD ["yarn", "start"]is for the runtime. When a container is started using the final Docker Image,yarn startwill be run as boot up command.
Before starting to build Docker Image for the app, let’s quickly get an idea of Docker Engine and Docker CLI.
Docker Engine and CLI
Docker Engine is essentially a background process/service that can perform two primary actions:
- Build a Docker Image, commonly referred to as Container Image, using the Dockerfile
- Run containers using the Docker Images or Container Images
The Docker Client or Docker CLI interacts with Docker Engine to perform various tasks. Tasks such as building docker image, running container by providing an image, listing available docker images, listing actively running containers, stop/restart containers, etc.
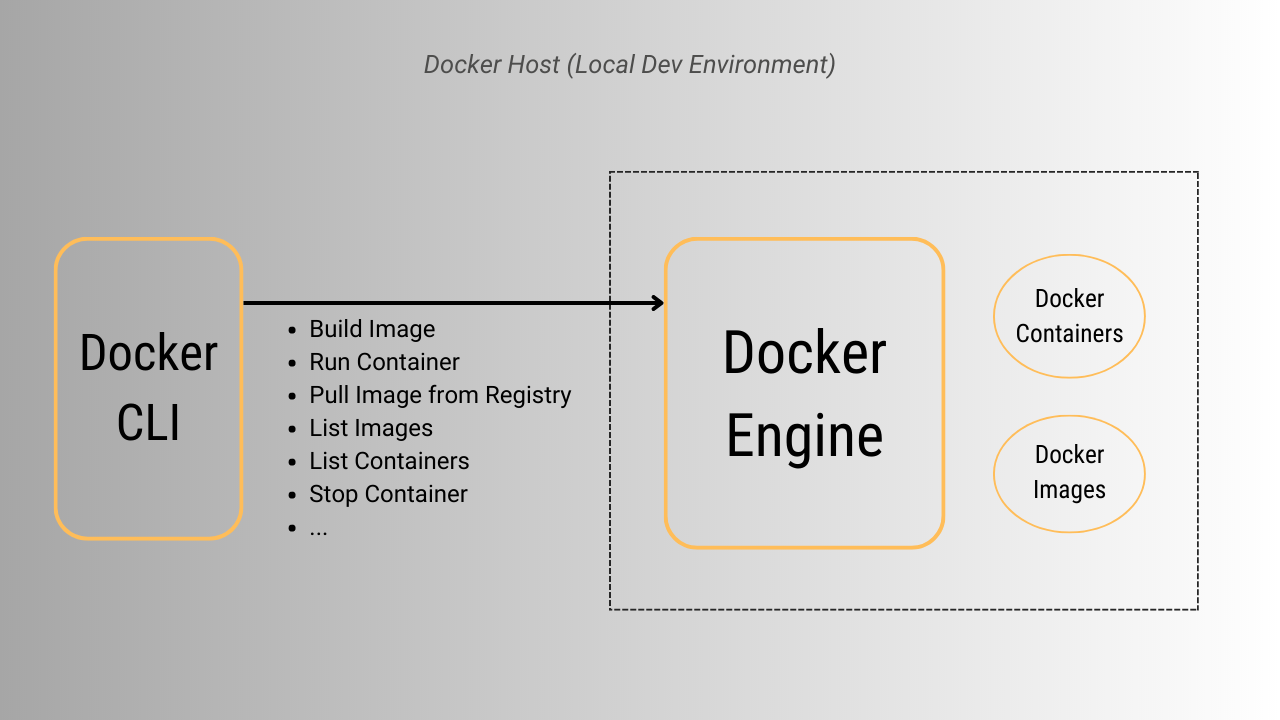
Docker Engine can run on various machines, including local development machines, laptops, and virtual or physical application servers. It is compatible with several operating systems, such as Windows, macOS, and various Linux distributions. The machine or OS on which Docker Engine runs is commonly referred to as the
Docker Host.

Build Application Image
To build a Docker Image, for your application, you use the following CLI command:
docker build -t myapp .
- In the example above for a Node application, make sure to place the Dockerfile under the code directory,
cdinto the directory and run the commanddocker build ...command - The Docker CLI communicates with Docker Engine to build a docker image the application. The build command requires two inputs: (1) the image name (mostly referred to as the
Image Tag) and (2) the directory where the Dockerfile is located. In this case,Image Tagis myapp and the current directory is used as the location of the Dockerfile
When running docker commands locally, the docker CLI communicates with Docker Engine through a Unix socket. However, the Docker Engine can also listen on a TCP port. This means that the Docker Engine can be located on a different machine than the one where the docker CLI command is executed.
Run Containers
Once we build a Docker Image using the docker build ... command, we can run a container using that image by executing the following CLI command:
# docker run <options> <docker-image> <optional-Start-up-command>
docker run –rm -it myapp yarn start
This command directs Docker Engine to:
- Use the
myappimage that we just built - Create a new container and in that container run
yarn startcommand
If a startup command is already defined in the Dockerfile, it’s optional to specify it when running the container. In the above example, we included yarn start as the startup command in the Dockerfile, so we don’t need to specify it again when running the container with the command docker run --rm -it myapp.
After starting the container and the service with yarn start, it may not be accessible yet because the environment is isolated to the container. For instance, if the service is listening on port 3000 inside the container, the host machine where Docker is running doesn’t have access to that port by default. However, we can map the container port to a port on the host machine using the -p flag in the Docker run command.
For example, to map port 3000 in the container to port 3001 on the Docker host, we can use the following command:
docker run --rm -it -p 3001:3000 myapp
This command maps port 3001 on the host machine to port 3000 in the container, allowing us to access the service at http://localhost:3001 on the host machine’s browser.
Containers can be run using pre-built images, whether they are for the application or other software. These images can come from a local machine or a remote registry, with DockerHub being one of the most popular. In fact, many of the base images we use, like the
node:19-alpineimage in our example, are downloaded from DockerHub. Other popular remote registries include Gitlab Registry, Github Artifactory, AWS ECR, and more.
Docker Images vs Docker Containers
By now, you should have a grasp of the fundamental concepts of Dockerfile, Docker Engine, and Docker CLI, as well as how to build an image and run a container.
To summarize, Docker Images act as blueprints for containers, containing the code/files/builds, dependencies, runtime, system tools, libraries, and settings. Docker Containers (or containers in general) are dynamic, running instances of those images, providing an isolated and self-contained environment that runs the application and its dependencies.
Summary
Here is a longer answer of what docker is and I think it will make sense now.
- Docker can be used by developers to run and package applications (web apps, APIs, background workers, etc) built using any programming language/framework such as Ruby & Ruby on Rails, Java & SpringBoot, and Node & Express, among others.
- Docker allows developers to choose an OS foundation for the container, such as Ubuntu, Alpine, etc.
- With Docker containers, applications can be built and run consistently across different systems, reducing compatibility issues.
- When an application is built with Docker, a container image is also created. The container image built will have everything it needs to run the application, simplifying the deployment process.
- The container image can then be provided to the Docker Engine to run the application locally, streamlining the development and deployment process.
I hope that helps get an idea of how Docker helps in the development and to an extent of deployments. But to realize the actual benefits, one should put this into practice and start using Docker, at least in the local development setup.
To learn more about Docker, try Dockerizing the application you’re working on or creating a new one using Docker. Here are some articles to help you get started with Docker in your local development environment.